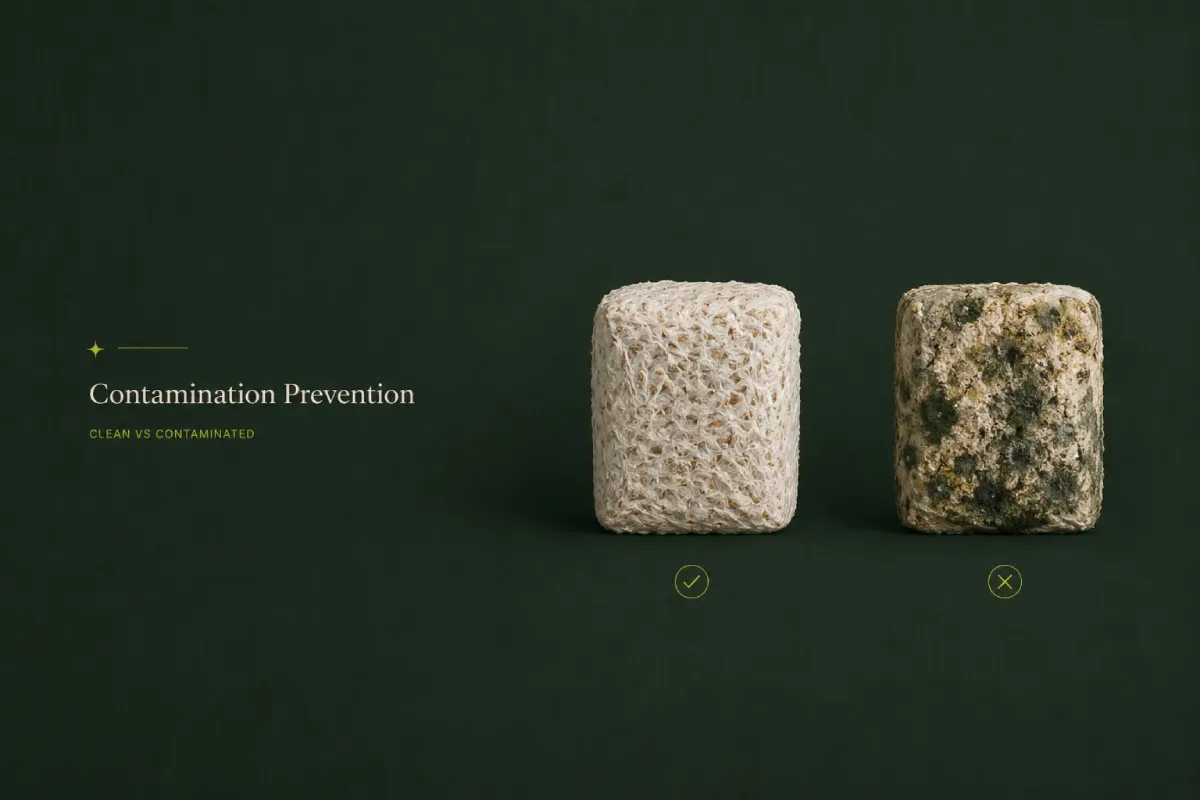
Mushroom contamination happens when competing organisms — molds, bacteria, or yeast — colonize your substrate before your mycelium can establish dominance. The three most common culprits are Trichoderma (bright green mold), Aspergillus (dark green or black powdery mold), and bacterial wet rot (slimy, foul-smelling substrate). At Foxfire Mushrooms in Longmont, Colorado, we talk to growers every week who’ve lost bags to contamination — and in almost every case, the cause traces back to one of the ten preventable mistakes below.
The good news: contamination is mostly a technique problem, not a luck problem. Get your process right, and your success rate will climb dramatically.
Contamination in mushroom cultivation means any organism other than your target species has taken hold in your substrate or spawn. Mycelium is in a race — it needs to colonize the substrate completely before opportunistic organisms get established. When your mycelium wins that race, you get clean colonization and eventually fruit. When it loses, you get a bag full of green fuzz, black powder, or rotten slime.
The most common contaminants in home cultivation:
Understanding what you’re fighting is step one. Fixing your technique is step two.
A contaminated bag isn’t just disappointing — it’s an economic problem. Consider what goes into a single grow:
A green bag discovered on day 14 represents all of that, gone. And if that Trichoderma is in your incubation space, it’s now shedding spores that will threaten your next grow too.
Prevention is dramatically cheaper than replacement. That’s why we put together this guide — and why at Foxfire, our colonized grain spawn comes fully colonized so you can skip some of the riskiest steps entirely.
Why it happens: Many growers learn that pasteurization (heating to 160–185°F) works for CVG (coco coir / vermiculite) and assume it works for everything. It doesn’t. High-nutrition substrates like oak soy hull pellets, supplemented sawdust, or master’s mix need true sterilization at 15 PSI / 250°F for 2.5–3 hours in a pressure cooker.
The science: pasteurization kills most bacteria and competitor molds, but leaves heat-resistant bacterial endospores alive. With low-nutrient CVG, your mycelium can out-compete anything that survives. With a nutrient-rich substrate like oak soy hull, you’ve created the perfect food source for whatever endospores made it through — and Trichoderma will find it before your mycelium does.
The fix: Know your substrate. CVG → pasteurize. Oak soy hull, supplemented sawdust, master’s mix → sterilize at 15 PSI. If you don’t have a pressure cooker, our sterilized oak soy hull bags come ready to inoculate.
Why it happens: You finish a long sterilization run, you’re tired, and you set the bags on the kitchen counter to cool. The bags are still hot — 200°F+ — and they’re pulling air through their filter patches as they cool. Whatever’s in that kitchen air (mold spores, yeast, bacteria) gets sucked right in.
Hot substrate cools over 4–6 hours. That’s a long time to be drawing in ambient air in a non-sterile environment.
The fix: Let substrate cool inside a clean environment — a still air box, a clean closet with the door cracked, or in front of a HEPA air purifier. Never cool bags in a kitchen, garage, or anywhere near fruiting chambers, compost, or potted plants. Temperature target before inoculation: below 95°F (comfortable to hold against your forearm for 10 seconds).
Why it happens: It feels excessive. You just washed your hands. How dirty could they be? Very dirty, microbiologically speaking. Your skin harbors billions of bacteria and yeast even after thorough washing. One touch of a colonized grain jar’s mouth transfers a significant microbial load.
Gloves that are torn, re-used without re-sanitizing, or pulled on without first spraying the outside with isopropyl are nearly as bad as bare hands.
The fix: Fresh nitrile gloves every session. Wipe the outside with 70% isopropyl alcohol after putting them on. Re-spray every time you touch a non-sterile surface. This is non-negotiable.
Why it happens: Still air boxes feel clunky and low-tech. Flow hoods are expensive. So growers try to inoculate quickly in open air, assuming speed is enough protection.
It isn’t. Ambient air contains thousands of mold spores per cubic meter. You can’t inoculate fast enough to beat physics.
The fix: A still air box (SAB) is a clear storage tote — typically 50–100 gallon — with two arm holes cut at a comfortable height. Total cost: $15–20. Let the box sit undisturbed for 10–15 minutes before working inside it to let airborne particles settle. This simple tool alone can cut contamination rates by 50–70% for most home growers. Serious cultivators should invest in a laminar flow hood for consistent, professional-grade results.
Why it happens: Spawn isn’t cheap, and growers try to stretch it. A 3lb grain spawn bag gets split across too many jars or substrate bags, leaving each one underpowered.
Low spawn rates mean slow colonization. Slow colonization means more time for contaminants to get established before your mycelium can assert dominance. The contamination window is measured in weeks — every day counts.
The fix: Target 10–20% spawn by weight (e.g., 400–800g of grain spawn per 4lb substrate block). For grain-to-grain transfers, err toward the higher end. When you inoculate generously, your mycelium colonizes faster and crowds out competitors. Our colonized grain spawn bags make it easy to inoculate at the right rate without the math getting complicated.
Why it happens: Impatience. You’ve been waiting 6 hours for these bags to cool and they feel warm-ish but not hot. You assume it’s close enough. For liquid culture, it isn’t. Substrate above 95°F kills the delicate mycelium in your liquid culture syringe on contact, leaving dead biological material that becomes contamination food.
The fix: Always perform a touch test before inoculating. Hold the bag or jar against your inner forearm for 10 seconds. If it’s uncomfortable, it’s too warm. Wait. This is a case where patience directly equals clean bags.
Why it happens: Some guides don’t mention it. Others mention it but don’t explain why it matters so dramatically.
When you inoculate a grain jar with liquid culture, the mycelium begins colonizing from the injection point outward. Without shaking, you get a slow central mass while the outer grains remain uncolonized — and therefore vulnerable — for weeks. With shaking, you distribute the mycelium throughout every grain and compress the colonization window from 4+ weeks to 2–3 weeks.
The fix: Shake vigorously immediately after inoculation. Shake again at day 3–5 when you see initial colonization threads. Aggressive shaking at the right times is one of the highest-leverage moves in contamination prevention.
Why it happens: The fruiting chamber is in the same room as the inoculation station. Old spent substrate is bagged nearby waiting to go outside. The counters haven’t been wiped in a week.
Mushroom rooms accumulate Trichoderma and Aspergillus spores rapidly, especially if you’ve had any contaminated bags. Even healthy fruiting chambers release spores into the air. Inoculating near them is asking for trouble.
The fix: Designate a separate, dedicated inoculation area — ideally a different room. Clean all surfaces with a 10% bleach solution before each session. Never inoculate near fruiting chambers, spent substrate, potted plants, or open windows. If possible, run a HEPA air purifier in your inoculation space for 30–60 minutes before working.
Why it happens: Growers assume more moisture = more mushrooms. This is true up to a point. Beyond that point, excess moisture creates anaerobic pockets where bacteria thrive. Wet rot — dark, slimy, with a distinctly rotten smell — is the result. Condensation dripping back into an open grain jar is also a direct contamination vector.
Substrate should be at “field capacity” — when you squeeze a handful tightly, only a few drops of water should come out. Not a stream. Not bone dry.
The fix: Mix substrate to field capacity before sterilizing, not after. If condensation pools inside a sealed bag, angle it slightly to prevent drip-back. For long colonization runs, make sure your bags have adequate filter patches that allow moisture to escape as vapor rather than pool as liquid.
Why it happens: Growers want their grows to succeed. They convince themselves that patch of green is just a metabolite, or that musty smell is normal. It almost never is.
Trichoderma spreads in 24–48 hours. A patch the size of a dime becomes full-bag contamination within days. Every hour you wait is exponentially more spores in your environment.
The fix: Learn what contamination looks like (see the next section) and act immediately when you see it. Quarantine the bag by double-bagging it and removing it from your growing space. Contamination does not resolve itself. Green mold does not go away. Acting fast protects your other grows.
| Contaminant | Color/Appearance | Smell | Speed |
| Trichoderma | Bright green to olive-green; powdery or fuzzy | Musty, earthy | Very fast (24–48 hrs to spread) |
| Aspergillus | Dark green to black; powdery; often at injection points | Musty | Moderate |
| Bacterial wet rot | Dark brown or black; slimy, wet texture | Foul, rotten, sour | Can appear seemingly overnight |
| Neurospora (red bread mold) | Orange to pink; fast-spreading | Faintly sweet | Extremely fast |
| Lipstick mold (Sporendonema) | Pink to coral red | Mild | Moderate |
| Cobweb mold | Grey; wispy and thin; not dense | Minimal | Slow |
When in doubt, quarantine first and investigate second. You cannot tell some contaminants from mycelium at a glance — but you can remove the bag safely and examine it closely outside your clean space.
New growers frequently panic about things that are completely normal, and overlook things that are actual problems. Here’s what’s normal and what’s not:
Normal and healthy:
Not normal — take action:
Still unsure? Photograph it and reach out to us at Foxfire — we’re happy to help you troubleshoot.
Step 1: Don’t panic — but don’t delay.
Pick up the bag gently without squeezing or agitating it. Squeezing can release a cloud of spores.
Step 2: Quarantine immediately.
Place the contaminated bag inside a trash bag and seal it. Remove it from your growing space right now — not after you finish checking the other bags.
Step 3: Assess the other bags.
Inspect every other bag and jar in your grow space carefully. If you see any additional signs of contamination, quarantine those too.
Step 4: Clean your space.
Wipe all surfaces with 10% bleach solution. If you had Trichoderma, assume spores are now on every surface in the room.
Step 5: Dispose safely.
Double-bag contaminated substrate and place in your outdoor trash — not compost. Trichoderma and Aspergillus in your compost will come back to haunt future grows.
When can you save a contaminated bag? Almost never, and we don’t recommend trying. The only possible exception: if you catch bacterial wet rot extremely early (day 2–3) on a grain bag where the contamination is clearly confined to one small area and hasn’t begun to smell, some growers successfully flame-sterilize a scalpel and remove the affected section. This requires good technique and some luck. For Trichoderma or Aspergillus, there is no saving the bag — discard immediately.
The best defense against contamination is a system that makes clean technique easy and automatic. Here’s what that looks like at different scales:
For home growers:
For intermediate growers:
Humidity without stagnation: This is a common stumbling block. You need high humidity for fruiting but stagnant humid air breeds contamination. The solution is gentle air exchange — a fan on a timer moving air slowly, not blasting. Foggers or ultrasonic humidifiers are great; just ensure air can circulate and filter patches can breathe.
Invest in your environment and your technique, and contamination becomes an exception rather than the rule. We’ve seen growers go from 50% contamination rates to under 10% just by implementing a still air box and committing to consistent glove use.
For more on setting up your first grow from scratch, see our beginner’s guide to growing mushrooms and our how to inoculate grain spawn guide.
The single biggest thing you can do to reduce contamination risk as a beginner? Start with substrate that’s already sterilized and spawn that’s already colonized. That eliminates the two riskiest steps in the entire process.
Every order from Foxfire is backed by our 30-day money-back guarantee. If your spawn doesn’t perform as expected, we’ll make it right — no runaround.
Questions about your grow? Reach out — we’re here to help every grower succeed, from first timers to serious cultivators.
Trichoderma produces enormous quantities of airborne spores that settle on surfaces throughout your grow space. A single contaminated bag can seed your entire room. The key is removing contaminated bags immediately before they mature and release spores, then doing a thorough bleach cleaning of all surfaces — walls, shelves, and equipment — not just the work surface.
Yes — that’s exactly what it’s for. Pack substrate into Unicorn Bags or mason jars, leave headspace, and process at 15 PSI (250°F) for 2.5–3 hours for quart jars and 3–4 hours for larger substrate blocks. Make sure your pressure cooker gauge is accurate — even 12 PSI instead of 15 PSI can leave endospores alive.
Not always, but treat it as Trichoderma until proven otherwise. Other green molds (some Penicillium species) can colonize grain, and they’re also a problem. The management approach is the same: quarantine and discard. Don’t waste time trying to identify the exact species.
Yellow or amber liquid or discoloration is usually a metabolite (a secretion from the mycelium itself) rather than contamination. It’s most common in grain jars, often appears after shaking, and typically reabsorbs as colonization continues. It has a mild, fungal smell — not a rotten one. If it’s accompanied by a foul odor or any green/black coloration, that changes the picture.
We strongly advise against it. Fruiting chambers release spores into the air with every mist and every flush, and those spores include not just your target species but any environmental molds that have colonized alongside them. Your inoculation area should be a separate, clean space.
Bacterial contamination can appear within 3–5 days of inoculation. Trichoderma typically becomes visible within 7–14 days. Some slow-growing contaminants don’t appear until week 3–4. This is why it’s worth inspecting bags every 2–3 days during incubation rather than just checking in at the end.
Yes, significantly. Liquid culture contains actively growing mycelium that colonizes faster than spore-inoculated substrate, giving your target species a head start over contaminants. At Foxfire, our liquid culture syringes are among the fastest-colonizing options we offer for this reason.
Share this article
Grab a beginner-friendly kit and apply what you just read —
or take the quiz and we’ll match you to the right
starting point.
